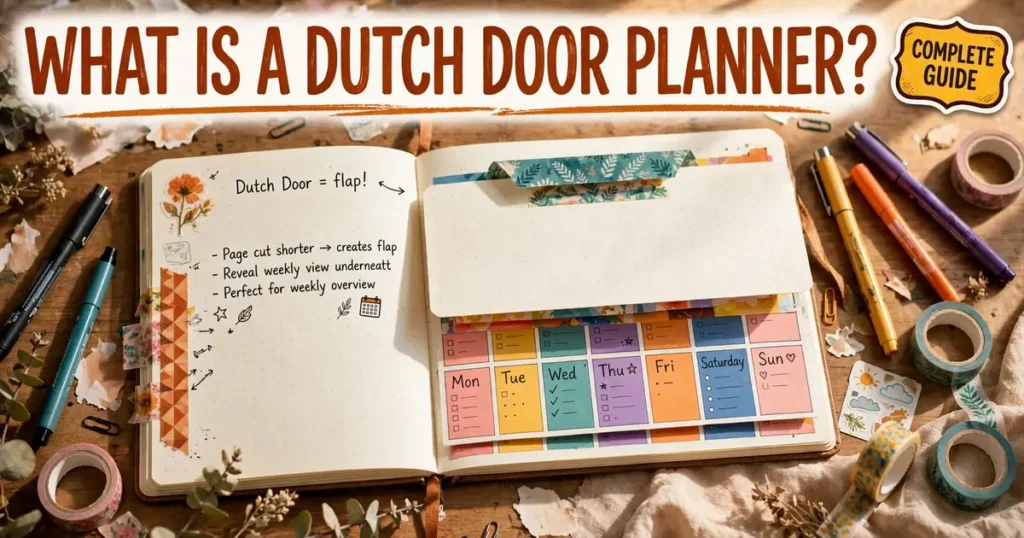
If you have spent any time in the bullet journal or planner community, you have probably seen the term “dutch door” and wondered what it means. So, what is a Dutch door planner? A Dutch door planner is a journal or planner that uses split pages — pages cut shorter or folded so that part of the page stays visible while you flip through the rest. The name comes from architecture: a traditional Dutch door (or stable door) is split horizontally so the top half opens independently while the bottom half stays closed. In a planner, the “door” is a page cut shorter than the rest, swinging over a full-size page behind it so you see both layers at once.
It looks complicated in photos but is simple once you understand the mechanics. This guide covers where the name comes from, the two main construction methods, exactly how to make one without ruining your journal, eight layout ideas, a no-cut alternative, and why ADHD planners love the technique. Prefer to skip the DIY? Download our free 8-page Dutch Door Planner starter pack — printable pages with the cut guides already marked.
How Dutch Doors Work in a Planner
The core problem a dutch door solves is simple: planners force you to choose what you see. Open your weekly spread and you see the week; flip to a daily page and the week disappears. Important reference information — your habit tracker, your week-at-a-glance, your running task list — keeps getting buried under turned pages.
A dutch door fixes this by making one layer permanent. Picture a weekly overview on a full-size page, with the daily pages in front cut to half height. Flip through the days while the week peeks out underneath — habits, appointments, and priorities stay in sight on every page.
The whole point of a dutch door is keeping the important stuff visible. If you have ever rewritten the same task list three times because it kept disappearing under turned pages, you already understand why this technique exists.
This “always visible” quality is also why dutch doors show up so often in ADHD planning discussions, which we will cover in detail later in this guide. For brains that struggle with out-of-sight-out-of-mind thinking, a tracker that literally cannot be flipped past is genuinely useful.
The Two Main Types of Dutch Doors
Almost every dutch door you will see falls into one of two construction styles. Both achieve the same visible-layer effect; they just get there differently.
1. The Cut Dutch Door (Shorter Pages)
This is the classic version. You cut one or more pages shorter — usually in half horizontally, though vertical cuts exist too. The shortened pages sit in front of a full-size page, so when you flip them, the exposed portion of the full page behind stays visible.
A typical setup: the weekly spread lives on the full-size pages, and the daily pages are cut to half height. Cut dutch doors are permanent — once you cut, there is no going back — which is why measuring twice matters (see the step-by-step section below).
2. The Folded Dutch Door (Folded Pages)
The folded version achieves the same effect without scissors. Fold a page in half — vertically or horizontally — so it behaves like a shorter page. The fold opens flat whenever you want the full page back, making this version reversible and ideal for beginners.
Folded dutch doors work beautifully in bound journals you do not want to permanently alter. The trade-off is a slightly bulkier page and a crease that some perfectionists dislike.
What You Need to Make a Dutch Door
- A ruler or straightedge — for measuring and as a cutting guide. Metal is ideal; a craft knife will not chew its edge.
- A craft knife or sharp scissors — a fresh blade gives the cleanest cut; small sharp scissors work for thinner paper.
- A cutting mat or thick cardboard — always cut on a protected surface, never with other journal pages underneath.
- A pencil — for marking your cut line lightly before committing.
- Optional: washi tape — reinforces the cut edge and prevents fraying.
If you are using a printable planner rather than a bound journal, the job is even easier: our free Dutch Door Planner starter pack already has the cut lines marked with a dashed guide and a small scissors icon, so you just print, cut along the dashes, and punch or clip the pages into your planner.
How to Make a Dutch Door: Step by Step
Follow these steps for a clean horizontal cut dutch door — the most popular style for weekly spreads. Read all the steps before you pick up the knife.
Step 1: Plan Which Pages Get Cut
Decide what stays visible (the “anchor” — usually your weekly overview, habit tracker, or task list) and which pages get shortened (usually the dailies). The anchor goes on full-size pages behind the cut pages. Count carefully: in a bound journal, cutting one leaf affects the page on its reverse side too, so sketch both sides on scrap paper first.
Step 2: Mark Your Cut Line
With ruler and pencil, draw a light, straight line across the page where you want to cut. For a weekly spread in an A5 journal, the horizontal midpoint is the standard choice — enough room for daily entries above, a generous strip of the weekly view below. Check that the line is level before moving on.
Step 3: Protect the Pages Behind
Slide your cutting mat or thick cardboard directly behind the page you are cutting. Beginners skip this step and regret it — a craft knife slices through several pages at once with nothing stopping it.
Step 4: Make the Cut
Hold the metal ruler firmly along your pencil line and draw the craft knife toward you in one smooth pass. Multiple light passes beat one heavy gouge. With scissors, cut just inside the line in a single continuous motion for the neatest edge.
Step 5: Finish the Edge
Erase visible pencil marks. Optionally run washi tape along the cut edge — it looks decorative and stops fraying. Test the door: flip the shortened pages and confirm your anchor section stays visible underneath.
If the idea of cutting makes you nervous, start with the folded method or the printable starter pack — both are fully reversible ways to learn the technique.
8 Dutch Door Ideas to Try
Once you understand the mechanics, the fun starts: deciding what goes on each layer. Eight tried-and-true combinations:
1. The Classic Weekly Spread
The anchor page holds your week-at-a-glance — appointments, deadlines, top three priorities. The cut pages in front hold daily entries. Flip through the days while the week stays visible. The layout that made dutch doors famous, and still the best starting point.
2. Monthly Overview + Weekly Pages
Month calendar on the full-size anchor page, weekly pages cut in front. See the whole month while planning individual weeks — no more flipping back to check dates.
3. Habit Tracker That Never Hides
Habit trackers fail because they get buried. Put a monthly habit grid on the anchor page, dailies on the cut pages in front. Every time you open your journal, the tracker is staring at you.
4. Mood or Symptom Tracker
A 1–10 mood scale, sleep hours, or symptom log on the anchor layer, next to your daily notes. Patterns across weeks become obvious in a way a hidden tracker never allows.
5. Meal Plan + Grocery List
Anchor page: the week’s meal plan. Cut pages: dailies with a grocery list section underneath. Plan meals while seeing the full week, then copy the list for the store.
6. Brain Dump Catch-All
A running brain-dump list on the anchor page — every stray thought and “don’t forget” in one visible place, with daily pages flipping over it. The weekly review becomes simply processing one visible list.
7. Project Dashboard
Milestones, deadlines, and key contacts on the anchor page; daily progress notes on the cut pages. A miniature project dashboard inside your journal.
8. Quote or Vision Anchor
An inspirational quote, vision-board strip, or word of the year on the anchor layer. Every flip reveals a small moment of motivation — journalers consistently rate this a favorite.
The Faux Dutch Door: No Cutting Required
Not ready to take scissors to your journal? The faux dutch door gives you the same layered effect with zero permanent changes. Fold a page — usually in half vertically or horizontally — so it behaves like a shorter page, and unfold it any time to get the full page back.
To make one: choose four consecutive pages. On the middle spread, fold the right-hand page back on itself and crease firmly. Lay out daily boxes on the visible surfaces and your tracker or weekly overview on the surfaces the fold reveals. Two minutes, completely reversible.
The faux method is also the best way to prototype. Try a layout as a faux door for a week; if you love it, commit with a real cut later. Many planner users never move past the faux version — the benefit comes from the visibility, not the cutting.
Why Dutch Doors Are Popular for ADHD Planning
Ask in any ADHD planner community what layout actually gets used, and dutch doors come up constantly. ADHD brains struggle with working memory — the mental sticky note holding “what was I doing?” Out of sight means out of mind, which is why traditional planners (flip the page, lose the plan) fail so many ADHD users.
A dutch door externalizes working memory onto paper. The anchor layer — top three tasks, habit tracker, time-blocked day — stays physically visible no matter which page you turn to. It cannot be flipped past. For time blindness, pairing a dutch door weekly overview with time-blocked dailies keeps the day’s structure one glance away.
If this resonates, our full ADHD Dutch Door Planner was designed specifically around these principles: visible trackers, a brain-dump catch-all, task chunking pages, and dutch-door cut guides on every relevant page. And if you want to test the concept first, the free 8-page starter pack includes an ADHD-friendly weekly layout you can try this week.
For ADHD planning, the best layout is the one you can see. A beautiful spread hidden three pages deep might as well not exist.
Common Dutch Door Mistakes to Avoid
- Cutting before planning both sides. Every cut affects the reverse side of the leaf. Sketch the full sequence on scrap paper first.
- Cutting without protection behind the page. A craft knife goes through multiple pages effortlessly — always keep a cutting mat directly behind.
- Making the anchor too busy. The visible layer works because it is glanceable. One to three elements maximum.
- Choosing the wrong cut ratio. Too much cut leaves dailies cramped; too little barely reveals the anchor. Half-and-half is the safe default.
- Forgetting page thickness. Several folded doors can stop a thick journal from closing. Cut doors avoid this entirely.
- Giving up after one awkward attempt. Everyone’s first dutch door is slightly crooked. It still works — and the second will be cleaner.
Keep the Paper Fun Going
Once you fall in love with paper planning, it tends to spill over. If you enjoy the tactile satisfaction of pen on paper, try our printable maze worksheets as a five-minute reset between planning sessions, or our music word search for adults for a screen-free evening wind-down. Planning with kids around? Our Halloween puzzle book for kids keeps little hands busy. And for the full collection, visit our puzzle shop.
Frequently Asked Questions
What is a Dutch door planner?
A Dutch door planner uses split pages — cut shorter or folded — so one section (like a weekly overview or habit tracker) stays visible while other pages flip over it. The name comes from architectural Dutch doors, split horizontally so the top half opens independently.
Do I have to cut my journal pages to make a dutch door?
No. A faux dutch door uses folding instead of cutting — fold a page in half so it behaves like a shorter page, then unfold any time to get the full page back. Fully reversible, and the best way to try the technique first.
What is the difference between a dutch door and a gatefold?
A dutch door keeps one layer permanently visible as an anchor (like a weekly overview) while other pages turn over it. A gatefold is usually a decorative fold-out revealing hidden content, not a persistent visible layer.
Can I use dutch doors in a printable planner?
Yes — printables are the easiest way to start because cut lines come pre-marked. Our free 8-page starter pack includes dashed cut guides: print, cut along the dashes, and add the pages to your planner.
Are dutch doors good for ADHD planning?
Many ADHD planners swear by them. The anchor layer (tasks, habits, the day’s structure) stays physically visible on every page, externalizing working memory onto paper — directly addressing out-of-sight-out-of-mind thinking.
What should I put on the visible anchor layer?
Whatever deserves permanent visibility: your week-at-a-glance, a habit tracker, top three priorities, a brain-dump list, or a meal plan. Keep it to one to three elements so the layer stays glanceable.
Start With the Free Starter Pack
You now know what a Dutch door planner is, how the two main types work, how to build one safely, and eight layouts worth trying. The fastest way to learn is to do — so download the free 8-page Dutch Door Planner starter pack, print the weekly layout, cut along the dashed guide, and plan your first dutch-door week today.